
On this layout
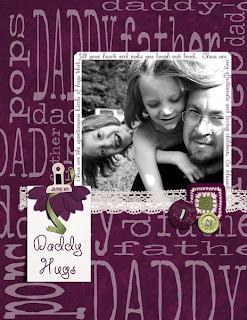
(Journaling: These are the spontaneous kinds of hugs that fill your heart and make you laugh out loud. These girls are very affectionate and loving children. So blessed. (June 09))
I somehow messed up the font on the top of the photo. I had to fix it and resave it, but I wasn't going to reprint it. I figure I really should figure out how much it costs to print my layouts. I am thinking that although the papers and embellishments are significantly less when comparing digital to paper, I probably spend an equivalent amount in papers and inks. I will have to do a cost chart, especially now that I have caught up.
My workflow goes something like this:
- Get an idea (photo or a challenge)
- Open the pieces I want to use -photo from PSE Organizer; supplies from Picasa (or PSE if I am opening a lot)
- Edit photos-convert to BW or Sepia, run actions, Auto SmartFix etc., Crop Last
- Open my blank letter-size document
- Sometimes, if my layout is complicated, I will do a template first to speed up the process.
- Save as a PSD, High Res. Jpeg for print, Low Res. Jpeg for posting (Wondering if it's necessary to save the PSD after I have printed. In the printing process you see things-like that font change-that you might not notice on the screen.)
- Save all files to a folder called 2009 Pages, with subfolders by title. Sometimes save photos that have been altered for a layout in the same folder as well.
- On to the next project!!
Happy Scrapping. Will post some of my layouts to my flickr account and link them here.
No comments:
Post a Comment