Thursday, December 31, 2009

Design Your Life Starts Today

Before I continue reading the rest of Week 1's material I want to take a moment to reflect on what I already know about design. These things I've learned from Noell Hyman, Cathy Zielske, Julie Fei-Fan Balzer, and by studying the elements of design some for my Math and Art class I took last summer.

This layout uses some of those things I've learned. I wanted to keep the focus on the idea of five so the choice to layer solid paper over patterned paper creates a central place for the eye to rest. The patterned paper frames the subject. The grouping of 3 squares creates movement simply by sliding it up into the frame area at the top of the page. The larger rectangle at the bottom balances the upper square as does the title. They work together to draw the eye to the center of the page. The color red is repeated throughout the layout in the "5", the title, and the 3 photos. There is a triangle formed with the title, the bottom photo, and the "5" that draws the eye toward the focal point-the tree photo.


("Every Life Has a Story" kit, The DigiChick Team)

Despite all that, I feel that I could improve this layout. I think the 5 needs to stand out a little more. Perhaps I should stroke it with the yellow to provide more contrast against the leaf photo.

I do really like this template though. We'll see if I learn how to make it work even better.

Wednesday, October 21, 2009

"I Love Your Smile" Contest at Ella Publishing


I have been wanting to do something with this photo of Sydney for a long time. This challenge at Ella Publishing was perfect.

I used Morning Sun kit JM Designs for Little Dreamer Designs and the fram.e is from Anna Aspnes' ArtPlay No5B kit.

Sunday, August 9, 2009

From Idea to Print-My Workflow Steps

I have been busy catching up on my printing. I think I printed 25 or more layouts Friday and Saturday. I had only two problems. On one layout Brett somehow hit the cord to the printer and the layout was almost all printed but the bottom inch. (I didn't reprint it.)

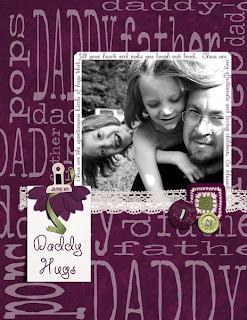
On this layout

(Journaling: These are the spontaneous kinds of hugs that fill your heart and make you laugh out loud. These girls are very affectionate and loving children. So blessed. (June 09))
[Deanna Jones, Flower Scraps, Summer Afternoon]

I somehow messed up the font on the top of the photo. I had to fix it and resave it, but I wasn't going to reprint it. I figure I really should figure out how much it costs to print my layouts. I am thinking that although the papers and embellishments are significantly less when comparing digital to paper, I probably spend an equivalent amount in papers and inks. I will have to do a cost chart, especially now that I have caught up.

My workflow goes something like this:
  1. Get an idea (photo or a challenge)
  2. Open the pieces I want to use -photo from PSE Organizer; supplies from Picasa (or PSE if I am opening a lot)
  3. Edit photos-convert to BW or Sepia, run actions, Auto SmartFix etc., Crop Last
  4. Open my blank letter-size document
  5. Sometimes, if my layout is complicated, I will do a template first to speed up the process.
  6. Save as a PSD, High Res. Jpeg for print, Low Res. Jpeg for posting (Wondering if it's necessary to save the PSD after I have printed. In the printing process you see things-like that font change-that you might not notice on the screen.)
  7. Save all files to a folder called 2009 Pages, with subfolders by title. Sometimes save photos that have been altered for a layout in the same folder as well.
  8. On to the next project!!
Happy Scrapping. Will post some of my layouts to my flickr account and link them here.


Sunday, August 2, 2009

Thank You Notes

I just finished this layout called "Thank You Notes." I just love the expression on Whitney's face when she opened this card from her preschool teacher Mrs. Joanie (Bjorkman).


I used a mini kit called "Sent with Love" by Vicki over at A Work In Progress. I think the theme of the kit fits perfect with the tone of the photos. I was able to work in a design triangle with the title, the corner elements and the envelope. The brown mat also leads the eye to the focal point photo.

The curled paper is a technique that I have wanted to try out but until I found this freebie from Gunhild, I was stumped how to do so. This layered psd file works very easily so I could get the perfect paper combination. I like how it looks. I also used stroke outlines on the photos to make them look matted. This is a new technique that I have only recently figured out how to do.

I have also figured out a way to create titles that makes the process of using alphas a little easier. I actually create a separate file roughly the size of the title space with a transparent background and then drag my letters to that. This works well, especially when you are trying to layer alphas with text as I did here. After you've put it together, you can rearrange and align without having to worry about clicking on other layers in your layout. Merge the layers and voila! you can drag the whole title to your page and resize as necessary. Sweet!


Finally_a focus


I have been digiscrapping all summer long and I have been learning some amazing stuff. I was sitting here this morning and I was downloading from the Summer Camp Blog Train at Stuff to Scrap when I realized that designers need to be consistent in how they name their files so it's easy to find their stuff. I noticed that a lot of the designers at STS use their initials then either the initials or the name of the kit-like MGD_Summer_Camp. I now recognize MGD as Mad Genius Designs. That's important because when I unzip my files I keep them in a folder for STS designers. That way if I am doing a challenge for that site, I can easily find my STS kits.

As I was thinking about this, I thought about what I would call my stuff (if I ever started designing) and my initials are ATL. So I came up with All Those Layouts! It's perfect because now I can use this blog to post my layouts and can direct friends and family to my blog as well. I sort of use facebook for this but it doesn't work so well. I can use facebook to link to here, right? I can update friends when I have posted new layouts. This should be fun.

So here's my initial post for All Those Layouts and I hope to keep them coming, especially as the school year gets underway. I love taking pictures and I love scrapping them. I also love sharing them and hearing what people have to say. Hopefully you (anonymous reader) will find something here you like and will be able to use in your own work!

Here's what I was working on last night. I am experimenting with holes in the paper because I saw a layout at Stephanie Howell's blog where she had used a punch of a butterfly to reveal the paper underneath. I liked it and thought I would try it for this PageMaps Apron Strings challenge.

Here's the pagemap.

Here's my take:

If_you_give_a_girl_post


Sunday, March 8, 2009

Blogs and Scrapbooking

I am trying to figure out how to use my blog and my facebook to inspire me to scrapbook. I have been reading lots of blogs from people directly related to the business of scrapbooking, designers in particular, but how does just a hobbyist use a blog for scrapbooking purposes. The big question is why have a blog in the first place? Who would read it? Do I have anything to say that anyone would be interested in anyway? How do I develop my own unique style scrapbooking? These are the questions that are going around as I pursue this blog thing.BlockquoteI am also wondering how to make my blog all fancy. And if I am spending time building my blog, when am I scrapbooking, because there is not unlimited time for these things. Dilemma.